It is extremely important for shot put throwers to hold, carry, and release the shot put correctly in order to execute a successful throw. The drills below give shot put throwers the ability to practice the process in order to perfect it. Rob Lasorsa provides drills with simple descriptions that allow the athletes understand and execute these techniques. I have personally used the drills below to help me improve my throws. These drills are great for both beginner and experienced throwers.
Grip
|
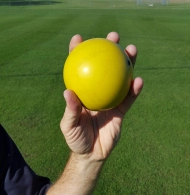
The drill is designed to work on the proper hand placement for the shot put throw.
|
The thumb sets on the side of the implement to help with control, and the fingers are spread behind the shot put.2 The shot put should be held on the base of the fingers and not on the palm of the hand.1
| 
https://coachingyoungathletes.com/2015/07/01/use-ice-cream-to-help-young-athletes-learn-the-shot-put-grip/
|
Carry
|
This drill is designed to help carry the shot put properly in order to have successful throw.
|
The athlete needs to place the shot put above the clavicle, under the chin and press it against the neck. The hand is positioned behind the shot put.
| 
http://trackandfield.about.com/od/techni3/ss/Shot-Put-Rotational-Technique.htm
|
Throw into the ground
|
This drill works on the proper technique for arm extension and the positioning of the hand (follow through).
|
The athlete will bend so the upper body is parallel to the ground. Using the grip and carry technique, from the previous drills, the athlete will push the shot put into the ground with full extension of the throwing arm.
| |
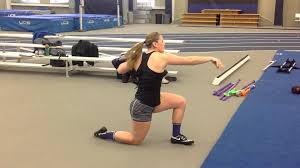
Kneeling Throw #1
|
Continued work on arm extension and follow through technique.
|
For a right handed thrower the athlete would place their right knee on the ground. The shot put is pushed in the throwing direction using arm extension, and the shot put is maintained in the same form from the grip and carry drills.
|  https://www.youtube.com/watch?v=PJRnelksP3I https://www.youtube.com/watch?v=PJRnelksP3I |
Kneeling Throw #2
|
Proper technique for the non throwing arm and throwing arm.
|
During this throw allow the non throwing hand to come towards the non throwing shoulder, but do not allow the shoulders to rotate.
|  https://www.youtube.com/watch?v=pXEbwKTphXM https://www.youtube.com/watch?v=pXEbwKTphXM |
Kneeling Throw #3
|
Continued proper throwing arm action.
|
We will continue the same kneeling position as stated in “Kneeling Throw #1”, but this drill includes the shoulders rotated at approximately 90 degrees to the right so the shot put is positioned behind the right hip. Push the shot put in the throwing direction like in the previous drills. The shoulders will naturally rotate forward.
|
References:
1Harsha, M. (n.d.). Basic Techniques for the Shot Put. In National Throws Coaches Association. Retrieved October 30, 2016, from http://www.nationalthrowscoachesassociation.com/basic_technique_for_the_shot_put.htm
2Lasorsa, R. (n.d.). Shot Put- Glide Technique. In National Throws Coaches Association. Retrieved October 30, 2016, from http://www.nationalthrowscoachesassociation.com/Shotput_Glide_Technique.htm
I think many people look at shot put and think it's easy because all you have to do is throw a ball, but there is so much more than that. Most don't realize how much technique goes into learning how to properly grip, carry and release the shot put. I liked this blog and it makes me miss doing shot put!
ReplyDelete